Securely Connect Remote IoT VPC Raspberry Pi AWS Example
Let’s face it, the world of IoT and cloud computing is evolving faster than you can say "smart fridge." If you're reading this, chances are you're diving headfirst into the deep end of secure remote connections for IoT devices, and that’s where securely connecting a Raspberry Pi to an AWS VPC comes into play. In this guide, we’ll break down the process step by step, ensuring your IoT setup is as secure as Fort Knox and as efficient as a Swiss watch. So, buckle up and let’s get started!
Connecting a Raspberry Pi to AWS isn’t just about setting up a device; it’s about building a robust infrastructure that can scale as your needs grow. Whether you’re managing a small home automation project or a massive industrial IoT deployment, securing your remote IoT VPC is crucial. This guide will walk you through the entire process, from configuring your Raspberry Pi to setting up secure tunnels in AWS.
But before we dive into the nitty-gritty, let’s address the elephant in the room: security. In the realm of IoT, security isn’t optional—it’s mandatory. A single breach can compromise your entire network, so we’ll make sure you’re armed with the knowledge to keep your setup locked down tight. Let’s get to it!
Understanding the Basics of IoT and AWS Integration
Before we jump into the technicalities, let’s take a moment to understand the ecosystem we’re working with. IoT, or the Internet of Things, refers to the network of physical devices embedded with sensors, software, and connectivity that allows them to exchange data. AWS, on the other hand, is the powerhouse behind cloud computing, offering a suite of services designed to handle everything from storage to machine learning.
When you combine IoT with AWS, you create a dynamic environment capable of handling massive amounts of data in real time. But here’s the catch: without proper security measures, your IoT devices become sitting ducks for hackers. That’s why securely connecting your Raspberry Pi to an AWS VPC is so important.
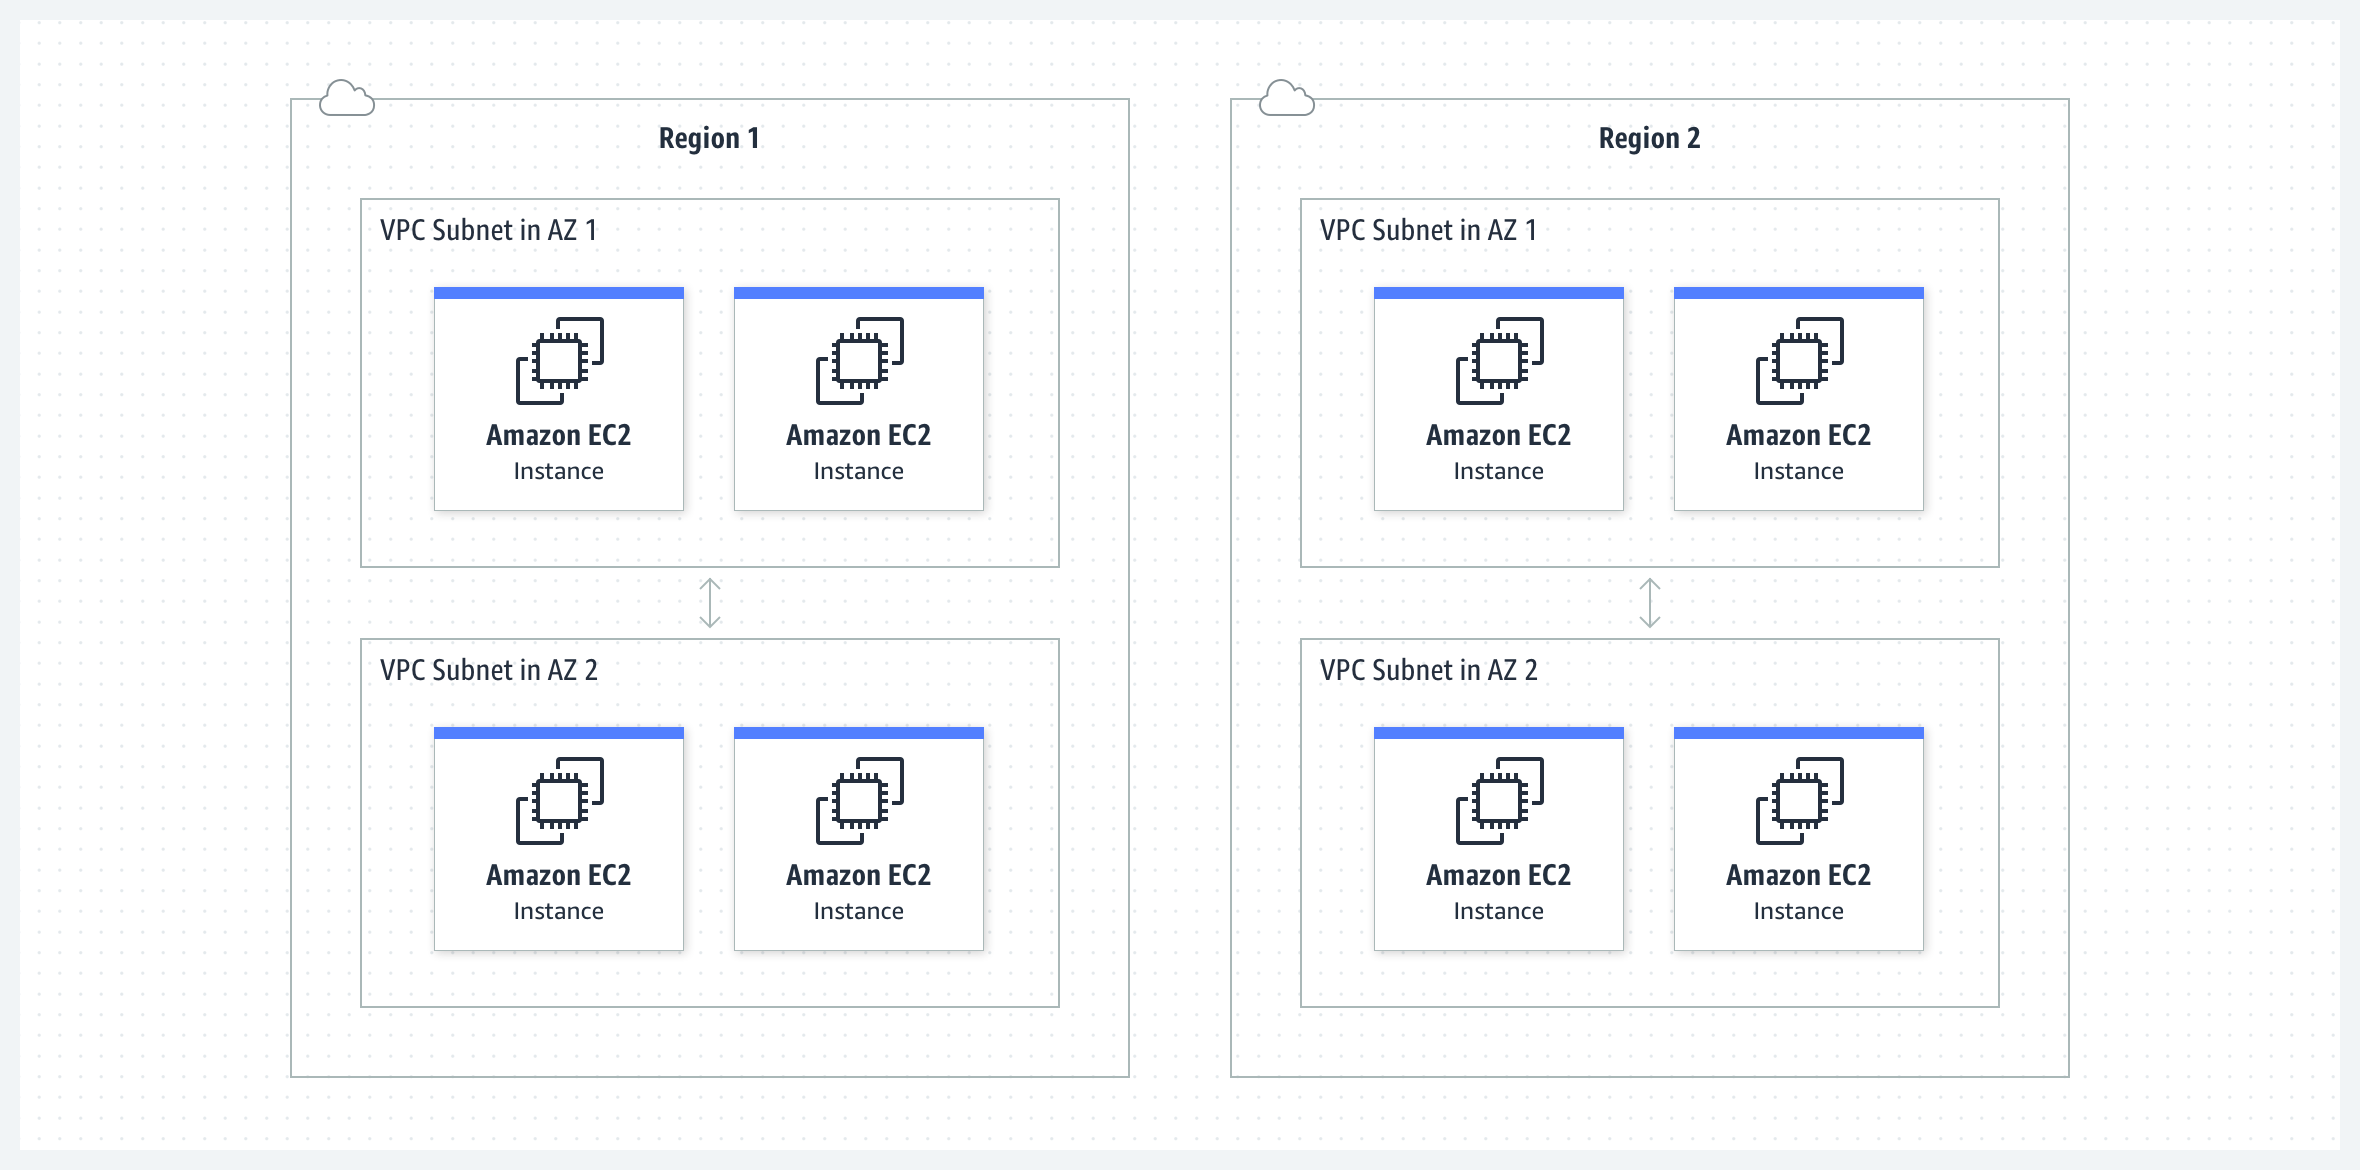
What Exactly is a VPC?
A Virtual Private Cloud (VPC) is essentially your own isolated section of the AWS cloud. Think of it as a private network within the public cloud, giving you full control over IP ranges, subnets, and security groups. By setting up a VPC, you can create a secure environment for your IoT devices to communicate without exposing them to the wider internet.
Now, let’s talk about why this matters. Imagine you’re running a smart home system with multiple IoT devices. Without a VPC, each device would be exposed to potential threats. But with a VPC, you can create a secure tunnel that ensures only authorized devices can access your network. Cool, right?
Setting Up Your Raspberry Pi for AWS
Alright, let’s get our hands dirty. The first step in securely connecting your IoT VPC is preparing your Raspberry Pi. For this guide, we’ll assume you’re using a Raspberry Pi 4 with Raspbian OS installed. If you haven’t set up your Pi yet, now’s the time to do it.
Installing Necessary Packages
Before we dive into AWS, we need to make sure our Raspberry Pi is properly configured. Start by updating your system with the following commands:
- sudo apt update
- sudo apt upgrade
Once your system is up to date, install the necessary packages for AWS integration. You’ll need the AWS CLI (Command Line Interface) and any additional libraries specific to your project. For example:
- sudo apt install awscli
- pip3 install boto3
These tools will allow your Raspberry Pi to communicate with AWS services seamlessly. Now that your Pi is ready, let’s move on to the next step.
Creating an AWS VPC for IoT
With your Raspberry Pi prepped, it’s time to set up your AWS VPC. Log in to your AWS Management Console and navigate to the VPC dashboard. From there, follow these steps:
Step 1: Launch a New VPC
Click on the “Create VPC” button and configure your settings. You’ll want to set a unique CIDR block for your VPC to ensure it doesn’t conflict with other networks. For example, you might use 10.0.0.0/16.
Step 2: Configure Subnets
Subnets are smaller segments within your VPC that allow you to organize your resources. Create at least two subnets: one for public access and one for private communication. This will help you manage traffic more effectively.
Step 3: Set Up Security Groups
Security groups act as virtual firewalls for your VPC. Define rules that specify which traffic is allowed to enter and exit your network. For example, you might allow SSH access from your IP address but block all other incoming traffic.
By following these steps, you’ll have a secure VPC ready to handle your IoT devices. But we’re not done yet—let’s talk about connecting your Raspberry Pi to this VPC.
Connecting Raspberry Pi to AWS VPC
Now comes the fun part: connecting your Raspberry Pi to your newly created VPC. This involves setting up a secure tunnel using AWS services like EC2 and Route 53. Here’s how you do it:
Step 1: Launch an EC2 Instance
From the AWS Management Console, launch an EC2 instance in the same VPC as your IoT devices. This instance will act as a bridge between your Raspberry Pi and the VPC. Choose an appropriate AMI (Amazon Machine Image) and configure your instance with the necessary security settings.
Step 2: Set Up SSH Tunneling
Once your EC2 instance is up and running, establish an SSH tunnel from your Raspberry Pi. This will allow you to securely connect to your VPC without exposing your devices to the public internet. Use the following command:
- ssh -i /path/to/key.pem ec2-user@ec2-public-ip -L 8080:localhost:80
This command sets up a local port forward, allowing you to access your VPC resources securely.
Step 3: Test Your Connection
Finally, test your connection by pinging a device within your VPC. If everything is set up correctly, you should be able to communicate with your IoT devices without any issues.
Best Practices for Secure IoT Connections
Now that you’ve successfully connected your Raspberry Pi to your AWS VPC, let’s talk about best practices to keep your setup secure. Here are a few tips:
- Use strong, unique passwords for all devices and accounts.
- Enable multi-factor authentication (MFA) wherever possible.
- Regularly update your software and firmware to patch vulnerabilities.
- Monitor your network for suspicious activity using AWS CloudWatch.
By following these practices, you can significantly reduce the risk of a security breach. But remember, security is an ongoing process—stay vigilant and adapt as new threats emerge.
Real-World Examples of IoT VPC Deployments
To give you a better idea of how this setup works in practice, let’s look at a couple of real-world examples:
Example 1: Smart Home Automation
Imagine you’re building a smart home system with multiple IoT devices, such as smart lights, thermostats, and security cameras. By setting up a secure VPC, you can ensure all these devices communicate safely without exposing your network to external threats.
Example 2: Industrial IoT Deployment
In an industrial setting, IoT devices might be used to monitor machinery, track inventory, or optimize production processes. A secure VPC ensures that sensitive data remains protected, even as the network scales to handle thousands of devices.
These examples demonstrate the versatility of IoT VPC setups and highlight the importance of security in every deployment.
Common Challenges and How to Overcome Them
As with any technology, there are challenges to consider when setting up a secure IoT VPC. Here are a few common issues and how to address them:
Challenge 1: Network Latency
Latency can be a problem when dealing with large-scale IoT deployments. To mitigate this, consider using AWS Direct Connect to create a dedicated network connection between your on-premises infrastructure and AWS.
Challenge 2: Device Management
Managing hundreds or thousands of IoT devices can be overwhelming. Use AWS IoT Core to simplify device management, allowing you to monitor and update devices from a single dashboard.
By addressing these challenges proactively, you can ensure a smooth and successful deployment.
Future Trends in IoT and AWS Integration
Looking ahead, the future of IoT and AWS integration is bright. Advances in edge computing, machine learning, and 5G technology are opening up new possibilities for IoT deployments. Here are a few trends to watch:
- Increased adoption of edge computing for faster data processing.
- Integration of AI and machine learning for predictive maintenance.
- Expansion of 5G networks for low-latency, high-bandwidth communication.
As these technologies mature, they’ll enable even more innovative IoT applications, from autonomous vehicles to smart cities.
Conclusion: Take Action Today
There you have it—a comprehensive guide to securely connecting your Raspberry Pi to an AWS VPC for IoT deployments. By following the steps outlined in this article, you can create a robust and secure infrastructure capable of handling even the most demanding IoT projects.
But don’t stop here! Take action today by setting up your own VPC and experimenting with different configurations. And don’t forget to share your experiences in the comments below—we’d love to hear how you’re using IoT and AWS to revolutionize your projects.
Thanks for reading, and happy hacking!
Table of Contents
- Understanding the Basics of IoT and AWS Integration
- Setting Up Your Raspberry Pi for AWS
- Creating an AWS VPC for IoT
- Connecting Raspberry Pi to AWS VPC
- Best Practices for Secure IoT Connections
- Real-World Examples of IoT VPC Deployments
- Common Challenges and How to Overcome Them
- Future Trends in IoT and AWS Integration
- Conclusion: Take Action Today


