What Is The 3 4 5 Rule For Laying Tile? A Simple Guide For Perfect Results
Ever wondered how professionals get those perfectly straight tile lines? Well, the secret weapon is the 3 4 5 rule for laying tile! Yup, it’s a game-changer. This ancient technique isn’t just for carpenters anymore; it’s now your best friend when it comes to tile work. Whether you’re renovating your bathroom or sprucing up the kitchen floor, this rule ensures everything stays square and aligned without breaking a sweat.
Let’s face it—tiling can be a bit intimidating, especially if you’re a DIY newbie. But don’t let that scare you off! The 3 4 5 rule is like having a cheat code for your project. It’s simple, effective, and will save you from those pesky crooked tiles that no one wants to deal with. Trust me, once you master this trick, you’ll be unstoppable.
Now, before we dive deep into the nitty-gritty of this magical rule, let’s talk about why it matters. Properly laid tiles aren’t just about aesthetics—they’re about functionality too. A well-aligned tile job ensures water flows where it should, prevents damage, and gives your space that polished look. So buckle up, because we’re about to level up your tiling game!
What is the 3 4 5 Rule Anyway?
Alright, so what exactly is this mysterious 3 4 5 rule? Simply put, it’s a mathematical principle based on the Pythagorean theorem. You remember that from school, right? Basically, it says that in a right triangle, the square of the hypotenuse equals the sum of the squares of the other two sides. In practical terms, if you measure three units along one side, four units along the other, and five units across the diagonal, you’ve got yourself a perfect right angle. Boom! Geometry just became your new BFF.
Why does this matter for tiling? Well, tiles need to be laid in straight lines that form perfect squares or rectangles. If your layout is even slightly off, it can throw off the entire project. The 3 4 5 rule helps you check and maintain those crucial right angles, ensuring your tiles are always square and aligned.
Why Use the 3 4 5 Rule for Laying Tile?
There are plenty of reasons why the 3 4 5 rule is a go-to method for pros and DIYers alike. First off, it’s incredibly accurate. Unlike eyeballing or relying on string lines, this technique gives you precise measurements every time. Plus, it’s super easy to implement with just a tape measure and some chalk. No fancy tools required!
Another big advantage is its versatility. Whether you’re working on a small backsplash or a massive floor, the 3 4 5 rule scales perfectly. It works for all kinds of surfaces and materials, making it an essential tool for any tiling project. Oh, and did I mention it saves time? Instead of redoing messy layouts, you get it right the first time. Who wouldn’t want that?
How Does the 3 4 5 Rule Work in Practice?
Okay, let’s break it down step by step. First, you’ll need to establish a starting point for your tile layout. This could be a wall, a corner, or any other reference point. From there, use your tape measure to mark three units along one side and four units along the adjacent side. Then, measure the distance between those two points diagonally. If it’s exactly five units, congrats—you’ve got a perfect right angle!
If the diagonal measurement isn’t five units, adjust one of your lines until it matches. Once everything is squared up, you can start laying out your tiles with confidence. Easy peasy, right? This process might sound basic, but trust me, it’s the foundation of a successful tiling job.
Common Mistakes to Avoid When Using the 3 4 5 Rule
Even with a foolproof method like the 3 4 5 rule, mistakes can still happen. One common error is not measuring carefully enough. Sure, it’s tempting to rush through the process, but taking shortcuts can lead to wonky tiles later on. Always double-check your measurements to ensure accuracy.
Another pitfall is assuming the floor or wall is already square. Newsflash: most aren’t! That’s why the 3 4 5 rule is so important—it compensates for imperfections in the surface you’re working on. Lastly, don’t forget to account for grout lines when planning your layout. Even the tiniest miscalculation here can throw off your entire design.
Tools You’ll Need for the 3 4 5 Method
Thankfully, you don’t need a whole toolbox to make this work. Here’s a quick rundown of what you’ll need:
- A reliable tape measure (at least 25 feet long)
- Chalk line or marking pencil
- Level for double-checking angles
- Trowel for spreading adhesive
- Tile spacers to keep everything even
See? Nothing fancy here. Most of these tools are probably already in your garage or home improvement kit. And if they’re not, they’re affordable and easy to find at any hardware store.
Step-by-Step Guide to Using the 3 4 5 Rule
Ready to give it a shot? Let’s walk through the process together:
- Start by identifying your starting point and marking it clearly.
- Measure three units along one side and mark the spot with chalk or tape.
- Do the same for four units along the adjacent side.
- Measure the diagonal distance between the two marks. It should be exactly five units.
- Adjust as needed until you achieve a perfect right angle.
- Extend your layout lines using a chalk line or level.
- Begin laying your tiles, using spacers to maintain consistent gaps.
That’s it! With these simple steps, you’ll have a perfectly squared layout in no time. Practice makes perfect, so don’t be afraid to try it a few times before diving into your main project.
Pro Tip: Work in Sections
For larger projects, it’s often smarter to work in smaller sections rather than trying to lay out the entire area at once. This helps maintain accuracy and reduces the risk of errors creeping in. Plus, it’s less overwhelming and allows you to focus on one part of the job at a time.
Benefits of Using the 3 4 5 Rule Over Other Methods
While there are plenty of ways to square up a tile layout, the 3 4 5 rule stands out for several reasons. For starters, it’s incredibly accurate and doesn’t rely on guesswork. Other methods, like using string lines or laser levels, can be finicky and prone to human error. With the 3 4 5 rule, you’re working directly with proven math, which is always reliable.
Another benefit is its simplicity. Unlike complex tools or techniques, this method is easy to learn and execute, even for beginners. And because it doesn’t require expensive equipment, it’s a budget-friendly option for DIYers. Lastly, it’s adaptable to different project sizes and materials, making it a versatile choice for any tiling job.
Advanced Techniques for Perfect Tile Layouts
Once you’ve mastered the basics of the 3 4 5 rule, you can start exploring more advanced techniques to take your tiling skills to the next level. For example, consider using a dry run to test your layout before committing to adhesive. This lets you catch any issues early and make adjustments without wasting materials.
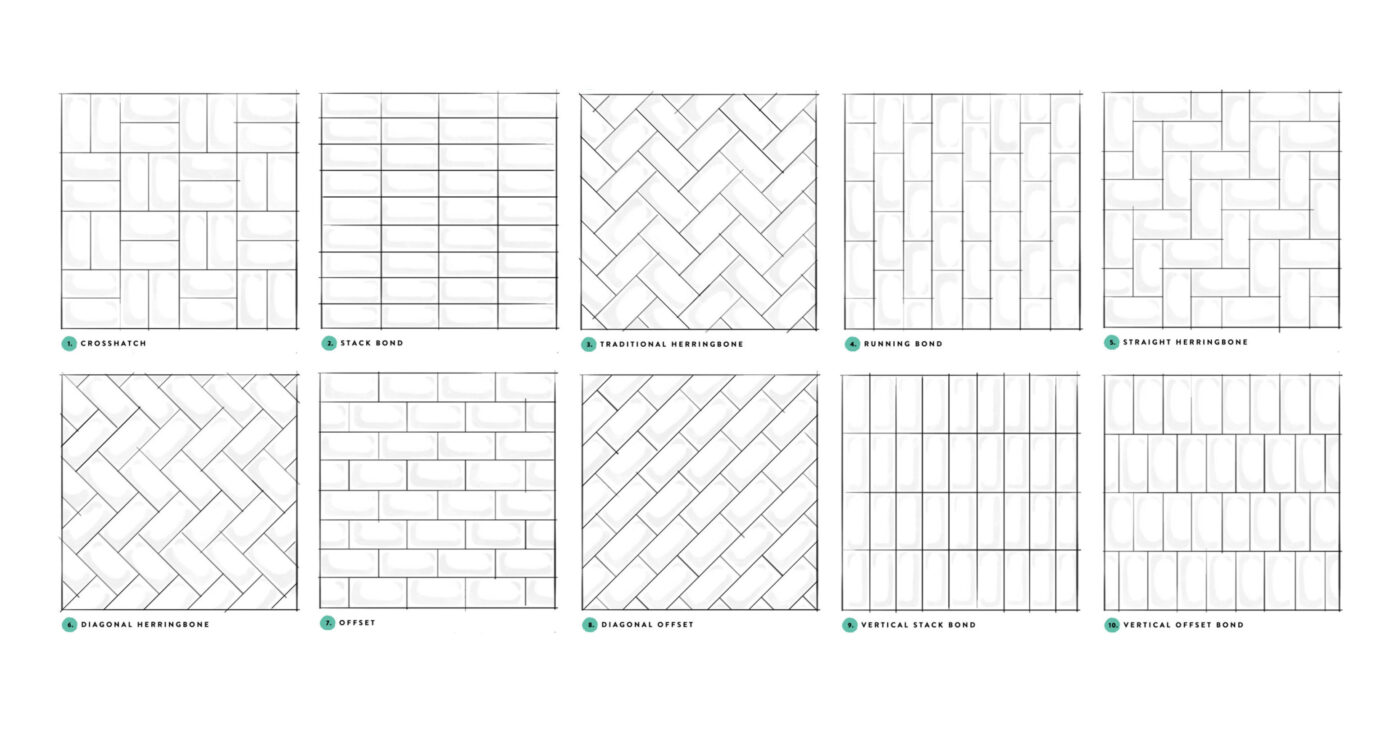
You might also want to experiment with different patterns and designs. While a standard grid layout is classic, there’s something special about creating unique patterns that reflect your personal style. Just remember to stick to the 3 4 5 rule to keep everything aligned, no matter how intricate your design gets.
Using Technology to Enhance Your Layout
While the 3 4 5 rule is all about simplicity, there’s no harm in embracing modern tech to enhance your project. Tools like laser levels or digital measuring devices can complement your traditional methods and provide extra precision. Just be sure not to rely on them completely—having a solid understanding of the 3 4 5 rule ensures you’re always in control of your layout.
Real-Life Examples of Successful Projects Using the 3 4 5 Rule
Let’s take a look at some real-world examples of how the 3 4 5 rule has transformed tiling projects. One homeowner used this technique to renovate their kitchen floor, achieving a flawless grid pattern that wowed guests. Another professional contractor credits the 3 4 5 rule for helping them complete a large commercial project on time and within budget. These stories prove that this method works wonders, regardless of the scale or scope of the job.
Conclusion: Take Your Tiling Game to the Next Level
There you have it—the ultimate guide to the 3 4 5 rule for laying tile. Whether you’re a seasoned pro or a DIY novice, this technique is your key to success. By following the steps we’ve outlined and avoiding common pitfalls, you’ll be able to create stunning, perfectly aligned tile layouts with ease.
So what are you waiting for? Grab your tools, roll up your sleeves, and get started on your next tiling adventure. And don’t forget to share your results with us in the comments below—we’d love to see how the 3 4 5 rule transformed your project. Happy tiling!
Daftar Isi
- What is the 3 4 5 Rule Anyway?
- Why Use the 3 4 5 Rule for Laying Tile?
- How Does the 3 4 5 Rule Work in Practice?
- Common Mistakes to Avoid When Using the 3 4 5 Rule
- Tools You’ll Need for the 3 4 5 Method
- Step-by-Step Guide to Using the 3 4 5 Rule
- Benefits of Using the 3 4 5 Rule Over Other Methods
- Advanced Techniques for Perfect Tile Layouts
- Real-Life Examples of Successful Projects Using the 3 4 5 Rule
- Conclusion: Take Your Tiling Game to the Next Level


