How To Use Access Raspberry Pi Behind Router: A Beginner's Guide
Imagine this scenario: You’ve set up your Raspberry Pi as a personal server, media center, or maybe even a home automation hub, but you’re stuck behind your router’s firewall. How do you access it remotely? Don’t worry—we’ve all been there! In this guide, we’ll walk you through how to use access Raspberry Pi behind router step by step, ensuring you can control your Pi from anywhere in the world.
Whether you’re a tech enthusiast or just starting out with Raspberry Pi projects, understanding how to access your device remotely is a game-changer. It opens up endless possibilities, from monitoring your home security system to managing your personal cloud storage. This guide is designed to make the process as smooth and straightforward as possible.
By the end of this article, you’ll have everything you need to securely connect to your Raspberry Pi from outside your local network. Let’s dive in and unlock the power of remote access!
Table of Contents
- Understanding the Basics of Router and Raspberry Pi
- Preparing Your Raspberry Pi for Remote Access
- Setting Up Port Forwarding on Your Router
- Using Dynamic DNS for Easy Access
- Configuring SSH on Raspberry Pi
- Setting Up a VPN for Secure Connections
- Troubleshooting Common Issues
- Enhancing Security for Remote Access
- Alternative Methods for Accessing Raspberry Pi
- Conclusion: Take Control of Your Raspberry Pi
Understanding the Basics of Router and Raspberry Pi
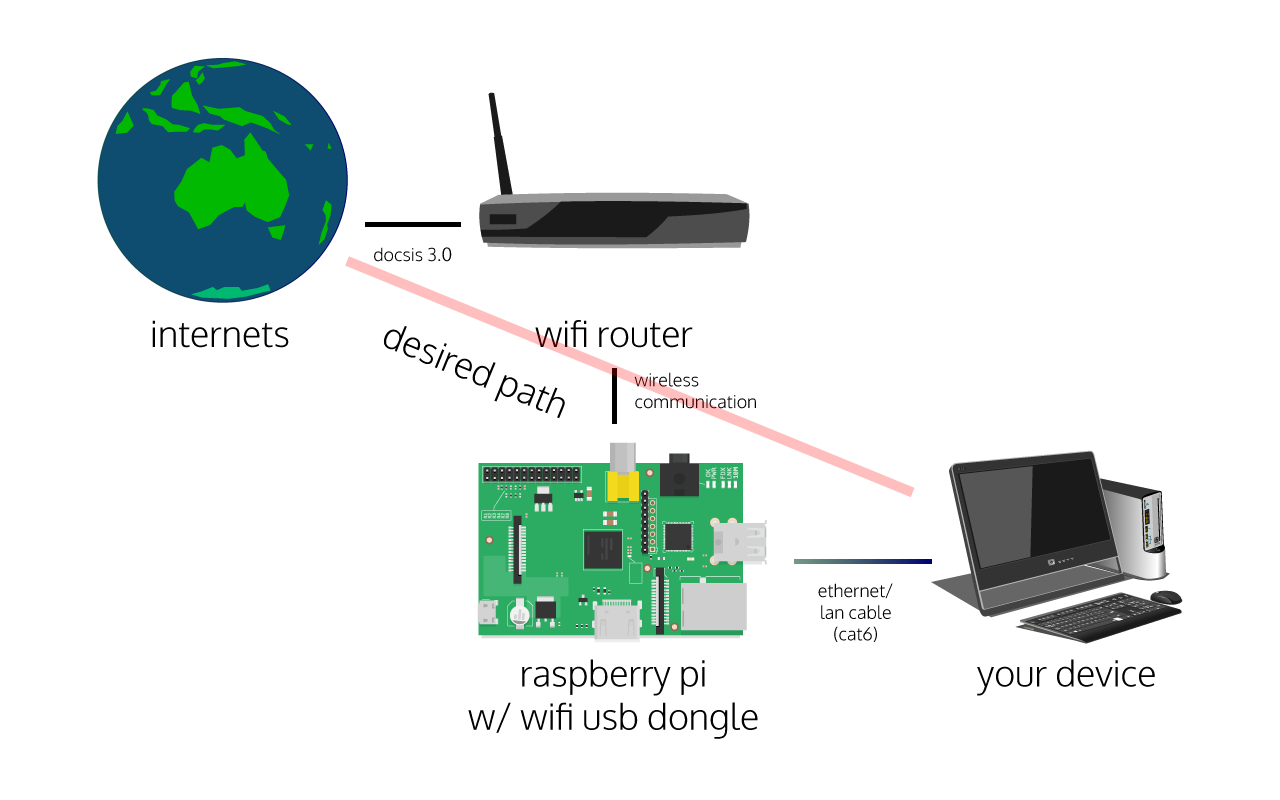
Before we dive into the nitty-gritty of accessing your Raspberry Pi behind a router, let’s break down some key concepts. Your router acts as a gatekeeper for your home network, assigning local IP addresses to devices like your Raspberry Pi. When you’re inside your network, accessing your Pi is easy—just use its local IP address. But what happens when you’re outside your network? That’s where things get tricky.
Think of your router as a bouncer at a club. It only lets certain traffic in and out based on predefined rules. To access your Raspberry Pi remotely, you’ll need to teach your router how to handle incoming requests. This involves setting up port forwarding, configuring SSH, and possibly using a dynamic DNS service.
Here’s a quick rundown of what you’ll need:
- A Raspberry Pi with an operating system installed (preferably Raspberry Pi OS).
- A router with port forwarding capabilities.
- An internet connection with a static or dynamic IP address.
- Basic knowledge of networking concepts (don’t worry, we’ll explain everything).
What Does Your Router Do?
Your router is the backbone of your home network. It connects all your devices to the internet and assigns them local IP addresses. When you try to access your Raspberry Pi from outside your network, your router needs to know which device to forward the request to. Without proper configuration, your router will simply block the request, leaving you stranded.
For example, if you want to access your Pi via SSH (Secure Shell), you’ll need to tell your router to forward incoming SSH traffic (usually on port 22) to your Pi’s local IP address. This process is called port forwarding, and it’s one of the key steps we’ll cover in this guide.
Preparing Your Raspberry Pi for Remote Access
Now that you understand the basics, it’s time to prepare your Raspberry Pi for remote access. This involves ensuring your Pi is set up correctly and has everything it needs to communicate with the outside world.
Step 1: Assign a Static IP Address
By default, your router assigns a dynamic IP address to your Raspberry Pi. This means the IP address can change every time your Pi reconnects to the network. To avoid this headache, assign a static IP address to your Pi. Here’s how:
- Log in to your Raspberry Pi via SSH or directly using a keyboard and monitor.
- Edit the network configuration file using the command:
nano /etc/dhcpcd.conf. - Add the following lines at the end of the file, replacing the placeholders with your actual network details:
interface eth0 static ip_address=192.168.1.100/24 static routers=192.168.1.1 static domain_name_servers=192.168.1.1
- Save and exit the file (
Ctrl+X, thenY, thenEnter). - Reboot your Pi to apply the changes.
Step 2: Install Necessary Software
Make sure your Raspberry Pi has all the necessary software installed for remote access. At a minimum, you’ll need:
- SSH server: Already included in Raspberry Pi OS, but ensure it’s enabled.
- A web server (optional): If you plan to host a website or run a web-based application on your Pi.
- Security tools: Firewalls, encryption software, etc.
Setting Up Port Forwarding on Your Router
Port forwarding is the process of telling your router which device to send incoming traffic to. This is crucial for accessing your Raspberry Pi remotely. Here’s how to set it up:
Step 1: Log in to Your Router
Open a web browser and enter your router’s IP address (usually 192.168.1.1 or 192.168.0.1). You’ll need your router’s login credentials, which are often found on a sticker on the router itself.
Step 2: Navigate to Port Forwarding Settings
Look for a section called "Port Forwarding," "NAT," or "Virtual Servers." The exact location varies depending on your router model.
Step 3: Add a New Rule
Create a new forwarding rule by entering the following details:
- Service Name: SSH (or any descriptive name).
- External Port: 22 (default SSH port).
- Internal IP Address: Your Raspberry Pi’s static IP address (e.g., 192.168.1.100).
- Internal Port: 22.
- Protocol: TCP.
Save the rule and restart your router if necessary.
Tips for Port Forwarding
Here are a few tips to ensure your port forwarding setup works smoothly:
- Double-check your Raspberry Pi’s IP address to avoid misconfigurations.
- Test the connection locally before attempting remote access.
- If your router supports UPnP, consider enabling it for automatic port forwarding (though this may introduce security risks).
Using Dynamic DNS for Easy Access
If your internet service provider assigns a dynamic IP address to your router, you’ll need a way to keep track of it. That’s where dynamic DNS (DDNS) comes in. DDNS services automatically update your domain name to match your router’s current IP address.
Popular DDNS Providers:
- No-IP
- DuckDNS
- Cloudflare
Follow your chosen provider’s instructions to set up DDNS on your router or Raspberry Pi. Once configured, you’ll be able to access your Pi using a domain name instead of an IP address.
DDNS Best Practices
Here are some tips for getting the most out of DDNS:
- Choose a provider with a reliable update client for your Raspberry Pi.
- Use a subdomain that’s easy to remember (e.g.,
myraspberrypi.duckdns.org). - Regularly test your DDNS setup to ensure it’s working correctly.
Configuring SSH on Raspberry Pi
SSH (Secure Shell) is the go-to protocol for remote access to Linux-based systems like Raspberry Pi. Here’s how to configure SSH on your Pi:
Step 1: Enable SSH
On Raspberry Pi OS, SSH is disabled by default. To enable it:
- Open the Raspberry Pi Configuration tool (
sudo raspi-config). - Select "Interfacing Options"> "SSH"> "Enable."
- Reboot your Pi.
Step 2: Test SSH Locally
Before attempting remote access, test SSH locally using the command:
ssh pi@192.168.1.100
Enter your Pi’s password when prompted. If everything works, you’re ready to move on to remote access.
SSH Security Tips
SSH is a powerful tool, but it’s also a potential security risk if not configured properly. Here are some tips to enhance SSH security:
- Change the default SSH port (22) to a non-standard port.
- Disable password authentication and use SSH keys instead.
- Limit access to specific IP addresses using firewall rules.
Setting Up a VPN for Secure Connections
While port forwarding and SSH are great for remote access, they may not provide the level of security you need. That’s where a Virtual Private Network (VPN) comes in. A VPN encrypts all traffic between your device and your Raspberry Pi, ensuring your connection is secure.
Popular VPN Solutions:
- OpenVPN
- WireGuard
- Tailscale
Choose a solution that fits your needs and follow the setup instructions. Once configured, you’ll be able to access your Pi securely from anywhere in the world.
VPN Configuration Tips
Here are some tips for setting up a VPN:
- Use a lightweight solution like WireGuard for better performance.
- Configure your Pi as the VPN server to avoid relying on third-party services.
- Regularly update your VPN software to patch security vulnerabilities.
Troubleshooting Common Issues
Even with careful planning, things can go wrong. Here’s how to troubleshoot common issues when accessing your Raspberry Pi remotely:
- Connection Refused: Double-check your port forwarding and SSH settings.
- Timeout Errors: Ensure your router’s firewall isn’t blocking incoming traffic.
- Dynamic IP Issues: Verify that your DDNS service is updating correctly.
If you’re still stuck, consult your router’s manual or reach out to your internet service provider for assistance.
Enhancing Security for Remote Access
Security should always be a top priority when accessing your Raspberry Pi remotely. Here are some additional measures to consider:
- Install a firewall on your Pi (e.g., ufw).
- Keep your Pi’s software and firmware up to date.
- Use strong, unique passwords for all accounts.
Alternative Methods for Accessing Raspberry Pi
If the above methods don’t suit your needs, here are some alternative ways to access your Raspberry Pi:
- TeamViewer: A user-friendly remote desktop solution.
- VNC: A graphical remote access protocol.
- Cloud Services: Host your Pi’s services on a cloud platform for easier access.

